添加依赖
-
-
添加Redis依赖,在pom.xml文件中添加以下依赖:
-
<dependency>
    <groupId>org.springframework.boot</groupId>
    <artifactId>spring-boot-starter-data-redis</artifactId>
</dependency>
-
-
application.yml 配置Redis连接信息
-
spring
cache
typeredis
redis
host127.0.0.1 # Redis服务器地址
database1 # Redis数据库索引(默认为0)
port6379 # Redis服务器连接端口
password# Redis服务器连接密码(默认为空)
指定缓存类型
redis
在Spring Boot 2.7中使用@EnableCaching注解启用缓存功能时,如果你想使用Redis作为缓存存储,你需要在配置文件中指定Redis的相关配置。
你可以在application.properties或application.yml文件中添加以下配置:
spring.cache.type=redis
这样配置后,Spring Boot会自动使用Redis作为缓存存储。当然,你也可以根据需要配置其他的Redis相关属性,比如密码、连接池等。另外,你还需要在项目的依赖中添加Redis相关的依赖,比如spring-boot-starter-data-redis。这样Spring Boot才能正确地使用Redis作为缓存存储。
-
3.配置缓存管理器
public class RedisTemplateConfiguration {
/**
* 默认过期时长,单位:秒
*/
private long expire = 60 * 60 * 24;
public RedisTemplate<String, Object> redisTemplate(RedisConnectionFactory factory) {
RedisTemplate<String, Object> redisTemplate = new RedisTemplate<>();
redisTemplate.setKeySerializer(RedisSerializer.string());
redisTemplate.setHashKeySerializer(RedisSerializer.string());
redisTemplate.setValueSerializer(RedisSerializer.java());
redisTemplate.setHashValueSerializer(RedisSerializer.java());
redisTemplate.setConnectionFactory(factory);
return redisTemplate;
}
public HashOperations<String, String, Object> hashOperations(RedisTemplate<String, Object> redisTemplate) {
return redisTemplate.opsForHash();
}
public ValueOperations<String, String> valueOperations(RedisTemplate<String, String> redisTemplate) {
return redisTemplate.opsForValue();
}
public ListOperations<String, Object> listOperations(RedisTemplate<String, Object> redisTemplate) {
return redisTemplate.opsForList();
}
public SetOperations<String, Object> setOperations(RedisTemplate<String, Object> redisTemplate) {
return redisTemplate.opsForSet();
}
public ZSetOperations<String, Object> zSetOperations(RedisTemplate<String, Object> redisTemplate) {
return redisTemplate.opsForZSet();
}
}
总之,通过@EnableCaching注解,我们可以方便地启用缓存功能,并结合Redis作为缓存实现。同时,通过@Cacheable注解,我们可以指定缓存名称和键值,实现缓存功能。
在使用@EnableCaching注解后,我们可以在需要缓存的方法上添加@Cacheable注解,以启用缓存功能。例如:
("dictType => 全局 根据字典类型查询字典详情数据信息")
(value = "/dictType/{dictType}")
(value = CacheConstants.DICT_DETAILS, key = "#dictType")
public R<List<SysDictDetail>> dictType( String dictType) {
return R.success(sysDictDetailService.selectDictDataByType(dictType));
}
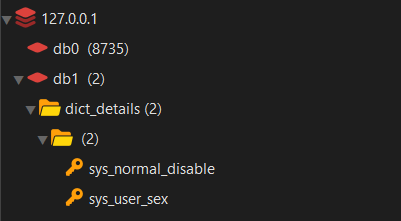
redis保存格式如下:


@EnableCaching,@Cacheable, @CachePut,@CacheEvict详解
1.@Cacheable
在启动类XXApplication.java主类中中加入注解@EnableCaching。
@Cacheable可以标记在一个方法上,也可以标记在一个类上。
-
当标记在一个方法上时表示该方法是支持缓存的
-
当标记在一个类上时则表示该类所有的方法都是支持缓存的
对于一个支持缓存的方法,Spring会在其被调用后将其返回值缓存起来,以保证下次利用同样的参数来执行该方法时可以直接从缓存中获取结果,而不需要再次执行该方法。Spring在缓存方法的返回值时是以键值对进行缓存的,值就是方法的返回结果,至于键的话,Spring又支持两种策略,默认策略和自定义策略,这个稍后会进行说明。需要注意的是当一个支持缓存的方法在对象内部被调用时是不会触发缓存功能的。
@Cacheable可以指定三个基本属性,value、key和condition。
-
1.1.1 value属性指定Cache名称
value属性是必须指定的,其表示当前方法的返回值是会被缓存在哪个Cache上的,对应Cache的名称。其可以是一个Cache也可以是多个Cache,当需要指定多个Cache时其是一个数组。
//Cache是发生在cache1上的
("cache1")
public User find(Integer id) {
return null;
}
//Cache是发生在cache1和cache2上的
({"cache1", "cache2"})
public User find(Integer id) {
return null;
}
-
1.1.2 使用key属性自定义key
key属性是用来指定Spring缓存方法的返回结果时对应的key的。该属性支持SpringEL表达式。当我们没有指定该属性时,Spring将使用默认策略生成key。我们这里先来看看自定义策略,至于默认策略会在后文单独介绍。
在@Cacheable注解中key的取值也可以使用SpringEL表达式来生成,内部可以嵌套方法的参数信息,例如,
(value = "fuck",key = "#id")
public List<String> getPrud(("test") String id){
System.out.println("如果第二次没有走到这里说明缓存被添加了");
List<String> list = new ArrayList<>();
list.add(id);
list.add("123");
list.add("123");
return list;
}
此处的key值生成就是使用getPrud方法中的id参数生成的,即fuck:: + 参数id,除了这种方法以外还可以使用keyGenerator策略来生成key,即实现KeyGenerator方法,
("myKeyGenerator")
public class MyKeyGenerator implements KeyGenerator {
public Object generate(Object o, Method method, Object... objects) {
return "";
}
在此方法中生成的返回值就是最终拼凑起来的test::后面的东西,实现方法之后再需要使用生成策略的方法中使用,
(value = "fuck",keyGenerator = "myKeyGenerator")
public List<String> getPrud(("test") String id){
System.out.println("如果第二次没有走到这里说明缓存被添加了");
List<String> list = new ArrayList<>();
list.add(id);
list.add("123");
list.add("123");
return list;
}
此方法的Redis缓存key值会按照fuck:: + myKeyGenerator组件中声明的返回值来生成。
除了上述使用方法参数作为key之外,Spring还为我们提供了一个root对象可以用来生成key。通过该root对象我们可以获取到以下信息。
| 属性名称 | 描述 | 示例 |
|---|---|---|
| methodName | 当前方法名 | #root.methodName |
| method | 当前方法 | #root.method.name |
| target | 当前被调用的对象 | #root.target |
| targetClass | 当前被调用的对象的class | #root.targetClass |
| args | 当前方法参数组成的数组 | #root.args[0] |
| caches | 当前被调用的方法使用的Cache | #root.caches[0].name |
当我们要使用root对象的属性作为key时我们也可以将“#root”省略,因为Spring默认使用的就是root对象的属性。如:
(value={"users", "xxx"}, key="caches[1].name")
public User find(User user) {
return null;
}
-
1.1.3 condition属性指定发生的条件
有的时候我们可能并不希望缓存一个方法所有的返回结果。通过condition属性可以实现这一功能。condition属性默认为空,表示将缓存所有的调用情形。其值是通过SpringEL表达式来指定的,当为true时表示进行缓存处理;当为false时表示不进行缓存处理,即每次调用该方法时该方法都会执行一次。如下示例表示只有当user的id为偶数时才会进行缓存。
(value={"users"}, key="#user.id", condition="#user.id%2==0")
public User find(User user) {
System.out.println("find user by user " + user);
return user;
}
2.@CachePut
对于使用@Cacheable标注的方法,Spring在每次执行前都会检查Cache中是否存在相同key的缓存元素,如果存在就不再执行该方法,而是直接从缓存中获取结果进行返回,否则才会执行并将返回结果存入指定的缓存中。
@CachePut也可以声明一个方法支持缓存功能。与@Cacheable不同的是使用@CachePut标注的方法在执行前不会去检查缓存中是否存在之前执行过的结果,而是每次都会执行该方法,并将执行结果以键值对的形式存入指定的缓存中。
@CachePut也可以标注在类上和方法上。使用@CachePut时我们可以指定的属性跟@Cacheable是一样的。
//每次都会执行方法,并将结果存入指定的缓存中
("users")
public User find(Integer id) {
returnnull;
}
3.@CacheEvict
@CacheEvict是用来标注在需要清除缓存元素的方法或类上的。当标记在一个类上时表示其中所有的方法的执行都会触发缓存的清除操作。
@CacheEvict可以指定的属性有value、key、condition、allEntries和beforeInvocation。其中value、key和condition的语义与@Cacheable对应的属性类似。即value表示清除操作是发生在哪些Cache上的(对应Cache的名称);key表示需要清除的是哪个key,如未指定则会使用默认策略生成的key;condition表示清除操作发生的条件。
此注解的使用方法与@Cacheable基本一致,也有三个基本属性,value、key和condition。不同的是在此注解中筛选出来的key值将被清除掉,例如:
(value = "fuck",key = "1")
public String test1(){
return "fuck";
}
同时@CacheEvict也有自己的独有的属性操作,下面我们来介绍一下新出现的两个属性allEntries和beforeInvocation。
-
3.1 allEntries属性 allEntries是boolean类型,表示是否需要清除缓存中的所有元素。默认为false,表示不需要。当指定了allEntries为true时,Spring Cache将忽略指定的key。有的时候我们需要Cache一下清除所有的元素,这比一个一个清除元素更有效率。
(value="users", allEntries=true)
public void delete(Integer id) {
System.out.println("delete user by id: " + id);
}
-
3.2 beforeInvocation属性 清除操作默认是在对应方法成功执行之后触发的,即方法如果因为抛出异常而未能成功返回时也不会触发清除操作。使用beforeInvocation可以改变触发清除操作的时间,当我们指定该属性值为true时,Spring会在调用该方法之前清除缓存中的指定元素。
(value="users", beforeInvocation=true)
public void delete(Integer id) {
System.out.println("delete user by id: " + id);
}
4.Caching
@Caching注解可以让我们在一个方法或者类上同时指定多个Spring Cache相关的注解。其拥有三个属性:cacheable、put和evict,分别用于指定@Cacheable、@CachePut和@CacheEvict。
(cacheable = ("users"), evict = { ("cache2"),
(value = "cache3", allEntries = true) })
public User find(Integer id) {
return null;
}
5.使用自定义注解
Spring允许我们在配置可缓存的方法时使用自定义的注解,前提是自定义的注解上必须使用对应的注解进行标注。如我们有如下这么一个使用@Cacheable进行标注的自定义注解。
({ElementType.TYPE, ElementType.METHOD})
(RetentionPolicy.RUNTIME)
(value="users")
public @interface MyCacheable {
}
那么在我们需要缓存的方法上使用@MyCacheable进行标注也可以达到同样的效果。
public User findById(Integer id) {
System.out.println("find user by id: " + id);
User user = new User();
user.setId(id);
user.setName("Name" + id);
return user;
}
常见问题:
1、缓存的值没有实现Serializable接口
Cannot serialize; nested exception is org.springframework.core.serializer.support.SerializationFailedException: Failed to serialize object using DefaultSerializer; nested exception is java.lang.IllegalArgumentException: DefaultSerializer requires a Serializable payload but received an object of type [cn.harry.common.api.R]
这个错误通常是因为在使用Spring Cache时,缓存的值没有实现Serializable接口,导致无法序列化。解决这个问题的方法是让缓存的值实现Serializable接口,以便在序列化时能够正确地将对象转换为字节流。下面是一个示例:
public class UserServiceImpl implements UserService {
private UserDao userDao;
(value = "user_details", key = "#id")
public Serializable getUserById(Long id) {
User user = userDao.getUserById(id);
return (Serializable) user;
}
}
在上面的示例中,我们在getUserById()方法上添加了@Cacheable注解,并指定了缓存名称为"user_details",缓存键为方法参数id。同时,我们将返回值类型改为Serializable,并将User对象强制转换为Serializable类型,以便在序列化时能够正确地将对象转换为字节流。
总之,让缓存的值实现Serializable接口是解决这个问题的关键。如果缓存的值无法实现Serializable接口,可以考虑使用其他的缓存实现方式,例如使用JSON格式存储缓存值。


文章评论